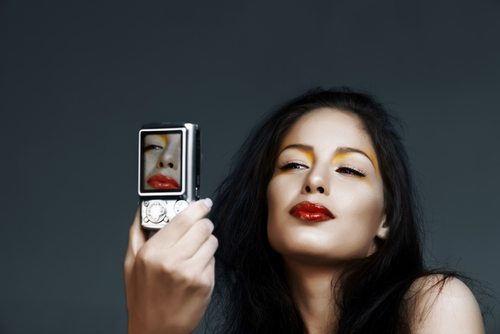
Eyelash extensions at home
Eyelash extensions from a professional service is not the most affordable. Especially if you add the cost of correction and removal of eyelashes to the final amount. There are other reasons that push to do eyelash extensions at home. In any case, you must be completely confident in your abilities, since the procedure requires a huge amount of patience.
Your first home lash extension is best done in tufts rather than lash extensions. Bundles, although they do not look as natural as eyelash extensions, are great for training the necessary skills. In this article, we will look at both types of extensions so that you have plenty to choose from.
Eyelash extension at home (Japanese)
Materials and tools: eyelashes, glue, straight tweezers, curved tweezers or a needle for separating the eyelashes, a glass for a drop of glue, silicone pads or adhesive tape to secure the lower eyelashes, a cotton swab and any alcohol-based tonic for degreasing.
How to choose eyelashes for building at home:
- Quantity. For two eyes, you will need 40-50 pieces (for incomplete volume), 80-100 pieces (for full volume), from 100 pieces (double or 3D volume). For beginners, we do not recommend taking on the creation of a 3D volume, because it is quite difficult.
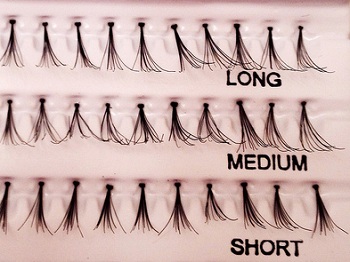
- Length. To make the extension look natural, the eyelashes should be three lengths. When choosing their length, be guided by the size of your own eyelashes. For most girls, 8mm, 10mm and 12mm lashes are suitable.
- Thickness. Surely you have heard more than once that mink, sable, silk and silicone are used for eyelash extensions. In fact, these words do not mean the material from which the eyelashes are made, but their thickness. Absolutely all eyelashes used for extensions are artificial. The thinnest are silk 0.10mm, followed by mink 0.15mm, followed by sable 0.20mm. Silk eyelashes are very thin, soft and light. When wearing them, you should be careful, as they tend to break. However, despite all their fragility, they remain the most popular for building. Mink is recommended only for those who have naturally strong and thick eyelashes. The weak and thin will not be able to hold them. After building up the mink, the effect of painted eyelashes is created. Sable - the thickest eyelashes. They give the look a special expressiveness. Suitable only for a small number of girls. You can grow sable only on very strong eyelashes.
- bend. Eyelashes are available with curves J, B, C, D, CC. The letter J indicates the smallest bend, and CC the maximum. In extensions, eyelashes with natural curves, designated B and C, are most often used. It is necessary to select a curve, focusing on the shape of your own cilia.
- Firms. Brands valued by eyelash professionals (in descending order of popularity): MACY, Vivienne, AG Beauty, DolcheVita, Glova, I-beauty, BIS, 3D lashes, BeautyChannel.
How to choose glue for eyelash extensions at home:
- Color. Black glue is used if your own eyelashes are dark; white or colorless if light.
- Brands. DolcheVita type A - suitable for extensions with open eyes, that is, to yourself. MACY type C+ - dries slowly, so good for beginners in building extensions. You can also try products that set quickly: AG UltraPlus, I-BeautyUltraBonding.
Eyelash extensions at home using Japanese technology (eyelash):
Peel off a strip of tape that is slightly longer than your eyelid. Stick it on top of your bottom lashes. It is very important that all eyelashes are under it, otherwise they will interfere with you during extension.
Soak a cotton swab in the toner and run it over your upper lashes to completely degrease them.
Now comes the first stage of building up -. Due to the lengthening and thickening of the eyelashes, the look becomes more expressive. If you like the result, you can stop at this stage.
You need to glue 20-25 eyelashes on each eye. To make the result look natural, part of the eyelashes from the outer corner of the eye to its middle is extended with 12mm cilia (or the length that you have the longest), the middle and inner corner of the eye - 10 and 8mm. First you glue a few number 12 eyelashes, then a few number 8 eyelashes in the corner of the eye, then number 10 in the middle and corner, then again in order 12-8-10. When the number of eyelash extensions reaches 20-25, proceed to the extension on the other eye.
Put 1-2 drops of glue on the glass. Lay out a bunch of eyelashes from each jar on a light fabric. You should have three small piles.
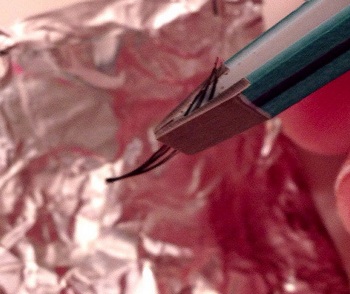
Take a 12mm eyelash and hold it close to the sharp edge with tweezers. Dip it in glue until the middle of the length. If there is excess glue, run an eyelash across the glass. *The eyelashes have a sharp and blunt edge. The sharp one is the top, the blunt one is the bottom. Always take the eyelash near the sharp edge, and dip the blunt one into the glue.
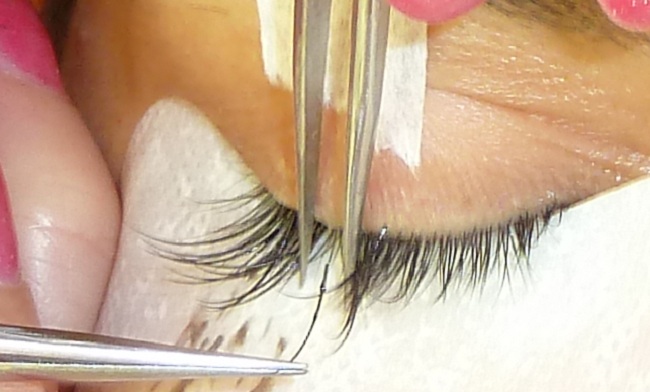
Spread the eyelashes and attach the artificial one to the beginning of the natural one.
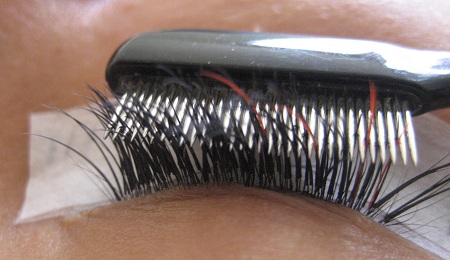
With a needle or tweezers, separate the eyelashes from the one to which you will attach the artificial one. Glue the artificial to the trunk of your own at a distance of 1-2 mm from the skin of the eyelid. When you attach it, you will have one thickened and elongated eyelash, which bifurcates at the end in the form of a small slingshot. Do not allow your own lashes to stick together. Keep sharing them.
Next, take a 12mm eyelash again, dip it in glue and stick it to your eyelash according to the rules described above. Eyelashes must be built up randomly, retreating from the previous place of extension, otherwise they will stick together. When done with 12mm lashes, move on to 8mm and 10mm. And so on until the whole eye is grown. By the end of the extension of an incomplete volume, the eyelashes on the eye should look natural: in the outer corner of the eye the longest, in the middle shorter, in the inner corner of the eye the shortest. Transitions from length to length should be smooth.
Move on to extensions on the second eye. At the end of the extension, the volume of the eyelashes on both eyes should be more or less symmetrical. Glue the eyelashes on the first eye, if there are not enough of them. This completes the creation of the partial volume.
Partial volume photo:
The stage of building up the full volume. During it, you must follow the same algorithm as the first time: increase 20-25 eyelashes for each eye. On the first eye, you find unoccupied eyelashes and glue artificial ones to them. First, number 12 from the outer corner to the middle of the eye, then 8 to the inner corner, then 10 to the middle and inner corner. When the first eye is finished, move on to the second.
After a full volume extension, make sure that both eyes look neat and symmetrical. Apply eyelashes if necessary. If you like the extension result, you can finish the procedure.
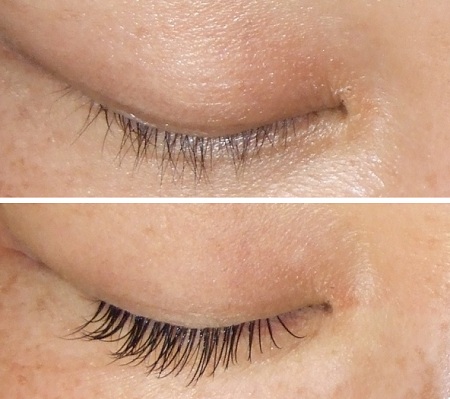
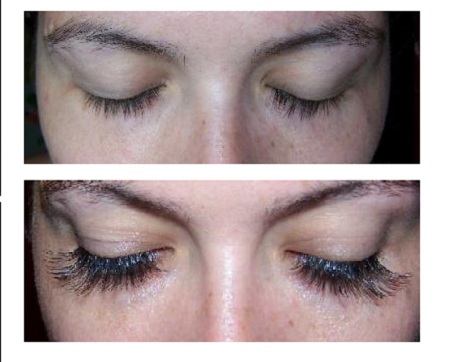
Before and after Full volume:

Double volume (3D). This one differs from the previous stages in that you will add another artificial one to each of your already extended eyelashes. We must act very carefully. Glue the lashes in random order, separating them at the end in the form of a flyer with three tips. First glue number 12, then 8, then 10. About 10 pieces for each eye. When both eyelids are done, visually evaluate the symmetry and add cilia where there are not enough of them.
Photo result Double volume:
3 weeks after eyelash extension at home, more about it at the link.
Colored eyelash extensions
Colored eyelash extensions are almost the same as non-colored ones. The only difference is that at the very beginning of the extension, you glue 15 black eyelashes on each eye (of different lengths: for example, 5 pieces of 12mm in the outer corner of the eyelid, 5 pieces of 8mm in the inner, 5 pieces of 10mm in the middle). Then you can make already colored eyelashes using the eyelash technology described above.
(!) Interestingly, colored eyelashes look like black indoors, but as soon as you go outside, their true color appears in all its glory.
Photo color extension (red):
Beam extension
Materials and tools: For beam eyelash extensions at home, you will need the materials listed in the paragraph on eyelash extensions. The only difference is that you do not need to purchase individual cilia, but bundles of cilia (3 different sizes: long for the outer corners of the eye, medium and short for the middle and inner corner of the eye). To build both eyes, you will need 15 to 20 bunches. Choose them according to the same parameters as individual eyelashes.
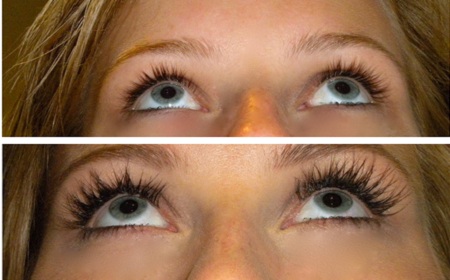
Photos before and after:

Extension progress:
Beam extension at home begins with the imposition of a silicone patch or a special adhesive tape on the eyelashes of the lower eyelid.
After applying tonic on a cotton swab, degrease the upper eyelashes. Put glue on the glass.
Pick up the tuft with the longest lashes with tweezers and dip its tip into the glue.
Using tweezers or a needle, spread the eyelashes near the outer corner of the eye and attach a bunch between them. In fact, the beam will be attached to the eyelid. After securing the bundle, separate the cilia with a needle.
Grab a bunch with tweezers
Beam extension is done one after another. Spread the next eyelashes and place another tuft smeared with glue between them. Do the same a few more times. When the space from the outer corner to the middle of the eye is extended, you can move on to building up the inner corner with the shortest bunches. Do everything the same as before. When you reach the middle, start gluing bunches of medium length.
Most often, beam eyelash extensions are carried out only on the outer corner of the eye. This makes the look a little unnatural, but very expressive.
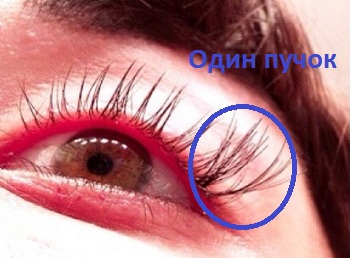
The corner of the eye is extended with 1 bunch
When you're done with the first eye, move on to the second. At the end of the extension, see if the cilia are symmetrical on both eyes. If not, grow more bundles where they are clearly not enough.
If this is your first time trying eyelash extensions at home, we advise you to start with a bunch. This technology is much simpler than Japanese, since you glue several cilia at once. Certainly, she has her downsides:
- Eyelashes extended in bunches create the effect of a doll look (but this is a matter of taste: someone really likes the stunning splendor of eyelashes)
- Bunches weigh down the eyelid
- Your own eyelashes can be damaged
- Lasts up to 3 weeks
- Not subject to correction. By the end of wearing, the bundles must be removed and built up again (article, at home)
- You can build up in bunches for 2-3 months in a row, then the eyes need a break for 3-4 months.
Answer